


There are many reasons why you should use microfrontend architecture in your projects. Microfrontend architecture feels natural if you are using microservices. It follows the same idea, only on the frontend side. It allows you to break one monolithic application into many smaller, feature-oriented applications. This means that you can form smaller teams that will be dedicated to certain features. And also, you can use different technologies and frameworks when creating these features.
There are various approaches to implementing microfrontend applications. Some of them are:
- hyperlinks (page loading for every frontend)
- iframes
- npm packages for every frontend
- loading several SPAs into one page
- Web components
Web components, compared to other solutions, have many benefits:
- we can use them in different frameworks
- CSS isolation using Shadow DOM
- we can use them with vanilla JS
In this post, we will talk about Angular approach to Web components. To implement Web components in Angular, we can use Angular Elements package. Angular Elements provide the possibility of exposing Angular components as custom elements. And we can do that without the need of learning Custom elements API. Then we can use custom elements in the shell application and dynamically load them per need. This is an example of the approach that my team and I used to implement this kind of architecture.
NOTE: This overview is written primarily for Angular 8. Code examples should work with newer versions after minor modifications. You can find update instructions in the Angular Update Guide.
Before we start, few notes about naming conventions related to this post. Web components is the name of the standard which allows you to create reusable encapsulated HTML tags and use them in web pages and web apps. Custom elements are a specification part of Web components standard. Custom elements are a set of APIs for designing and using new types of DOM elements. A custom element is also used to describe the element that is created using these APIs. Also, microfrontend applications are sometimes called micro apps.
Shell Project
Shell project handles dynamical loading of microfrontends and communication between them. It also contains common navigation and loads microfrontends based on the URL. This ensures a seamless transition between different SPA applications. Also, it prevents page reloading during the transition.
Shell project is implemented as a regular Angular app. It contains another library project that is used by microfrontend applications. Library contains common widgets like components, pipes, and services. This way we can achieve better uniformity in all our projects. Angular library is published as an npm package and then imported to other projects.
What's important is that we use CUSTOM_ELEMENTS_SCHEMA in the app module. In this way, we tell Angular that we will be using components that the compiler is not aware of. since we are using custom elements that are resolved by the browser. Our app module will look like this:
@NgModule({
  declarations: [AppComponent
  ],
  imports: [BrowserModule],
  schemas: [CUSTOM_ELEMENTS_SCHEMA],
  providers: [],
  bootstrap: [AppComponent]
})
export class AppModule { }
We will use @webcomponents/custom-elements polyfill for browsers that don't support web components. After the installation, we import it in polyfills.ts file.
import '@webcomponents/custom-elements/custom-elements.min';
Web components were designed for ES6. But most of the time we are down leveling our code to ES5 for better compatibility. Problem is that ES5 code does not support custom elements. To resolve this issue, we use native-shim.js file from @webcomponents/custom-elements package. We reference it in index.html.
<script src="./src/assets/custom-elements/native-shim.js"></script>
Microfrontend Projects
We will expose our microfrontend projects as custom elements using Angular Elements. Then, they can be loaded into a shell application. First, we need to install @angular/elements npm package. This package represents Angular Elements API, which we use to register our custom elements in app.module. Following is the example of the app module:
import { createCustomElement } from '@angular/elements';

[...]

@NgModule({
  [...]
  bootstrap: [],
  entryComponents: [
    AppComponent,
    ExampleComponent
  ]
})
export class AppModule {
  constructor(private injector: Injector) {
  }

  ngDoBootstrap() {
    const appElement = createCustomElement(AppComponent, { injector: this.injector});

customElements.define('root-app', appElement);

    const exampleElement = createCustomElement(ExampleComponent, { injector: this.injector});

customElements.define('example-component', widgetElement);

  }
}
Angular Elements are created dynamically at runtime. Because of that, we put components that are exposed as custom elements in entryComponents array. This way we are letting Angular know to prepare these components for us if needed at runtime. In this example two web components are created:
- root component of the microfrontend
- example component that will be loaded in the shell
Since these are not traditional Angular components, we load them using ngDoBootstrap method. If we use ngDoBootstrap method, we do not place them in bootstrap array. In this method, we create a wrapper for Angular component with createCustomElement. After that, we register this custom element with the browser using customElements.define. Method createCustomElement is a part of Angular Elements API and customElements.define is a part of browser Custom Elements API.
Building and Bundling Microfrontend Projects
Building microfrontend application using ng build command gives us several bundles. But that does not fit our need to have one single entry point for every microfrontend. The best solution for this is to have a single bundle per microfrontend. Then, the shell application will load this bundle and use components wrapped in it. There is an Angular CLI extension that allows us to do this: ngx-build-plus . First, we enable the extension in the angular.json file. Now, we can build a single bundle with a simple switch:
ng build --prod --single-bundle
If we look at bundle size, we can see that it is pretty big. That is because we are shipping Angular core with our components, including RxJS and other libraries. As a result, we get a bundle size that is big for small projects like microfrontends. Keep in mind, Angular microfrontend projects are wrappers for our custom elements. If we are loading multiple projects, we are loading all of these libraries multiple times. Project ngx-build-plus also has a solution to this problem: library sharing. Library sharing is achieved by loading Angular libraries into the global scope. Angular libraries are exposed as UMD bundles. This way, we can reuse them in microfrontend bundles.
Loading Microfrontend Projects in the Shell
Let's say we want to load a previously exposed custom element named example-component in the shell. We first create a script tag pointing to microfrontend bundle. Then we use example-component element as a regular HTML element.
<example-component></example-component>

<script src="microfrontend-endpoint/main.bundle.js"></script>
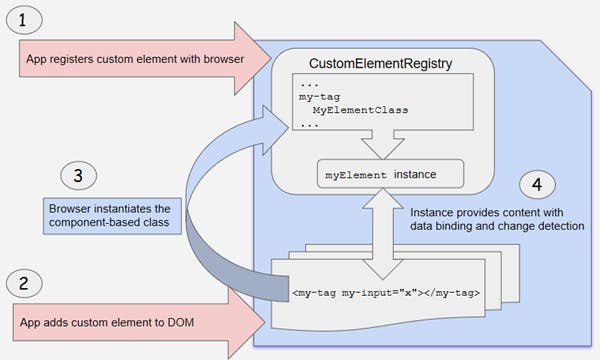
This is pretty straightforward. We could also do this dynamically and load the microfrontend when it's needed. Adding script tag to shell page means that script with Angular bundle is loaded. This also means that our Angular microfronted application will be bootstrapped and loaded. Remember that custom elements are registered in ngDoBoostrap method. This means they are added to the custom elements registry of the browser during bootstrapping. Then we will be able to use these element tags in the shell application. This illustration from Angular documentation describes the process pretty well.
Let's say that instead of example-component, we want to load root application component from microfrontend bundle. We have to keep in mind that it contains a router outlet. It will lookup for routes defined in the routing configuration of the microfrontend project module. Using routes and navigation this way can get a little tricky. We have to use named router outlets and implement a location strategy that will support this kind of architecture.
It is also important to decide how will we handle HTTP calls from our custom elements. We can handle all the HTTP calls in the shell project, but this breaks the thin service concept. In that case, the shell should be aware of all API calls from every microfrontend project. A cleaner solution is to add a prefix to every microfrontend HTTP call. Then we reroute the call to microfrontend project based on this prefix. In Angular microfrontend projects, we can do this using HTTP interceptor. Inside the interceptor, we can add a prefix to every HTTP request. Implementing route rewrites is beyond the scope of this post, but you could use HAProxy or other similar solutions.
Communication Between Microfrontends
As already mentioned, Angular Elements package creates a wrapper for Angular components. It also maps components inputs to attributes and outputs to custom events of the custom element. This means that we can use attributes and events for communication between wrapped components.
@Component({ ... })
export class ExampleComponent implements OnInit {

  @Input() inputMessage: string;

  @Output() outputMessage = new EventEmitter<any>();

  [...]
}
In the shell we can insert custom elements in the template. We can use Angular property binding to send data to the custom element and event binding to listen for events:
<example-component [inputMessage]="inputMessage" (outputMessage)="handleMessage($event)"></example-component>
Using this approach we can easily send information down to microfrontends. We can also broadcast messages from microfrontend to the shell. If we choose to load custom elements dynamically we can do it like this:
const exampleComponent = document.createElement('example-component') as NgElement & WithProperties<{inputMessage: string}>;
exampleComponent.inputMessage = 'Test';
exampleComponent.addEventListener('outputMessage', event => this.handleMessage(event));
Other alternatives are:
- using message bus in the global namespace
- custom events
- using query strings to send information.
Deployment and Putting it all Together
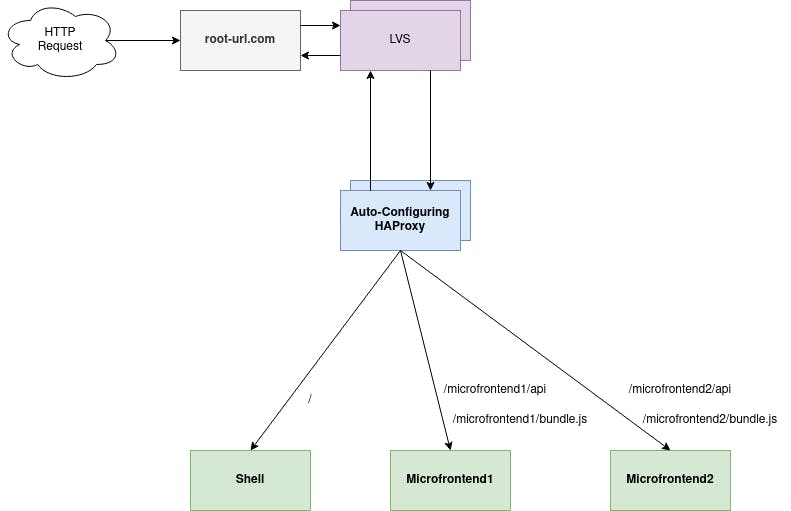
This diagram represents the structure we have implemented when integrating microfrontends and shell. It's simplified a bit and some layers are left out, but the basic idea is the same. Microfrontend deployment builds contain API methods and the bundle with our custom elements. They are deployed and placed behind a load balancer that will handle path rules and URL rewrites. The load balancer is set up in a way that microfrontends can register what paths they are going to handle. The load balancer will then configure the routes automatically. Every microfrontend is going to handle URL paths that point to API methods and the JS bundle. Shell project also registers with the load balancer and registers to handle all other paths.
For example, path /microfrontend1 will be opened in the shell. Based on the route, the shell will load JS bundle from path /microfrontend1/bundle.js which is handled by Microfrontend1 project. The Angular application contained in the bundle bootstraps and custom elements are registered. Custom elements for this microfrontend project are dynamically injected in the shell. All HTTP calls that originate from Microfrontend1 custom elements have /microfrontend1/api prefix. This means they also will be handled by Microfrontend1 service. All navigation changes are propagated from custom elements to shell using output properties and custom events. Shell then handles navigation changes and renders components based on these events.
Conclusion
There are many ways to implement a microfrontend environment. It can get complicated if you don't find the solution that fits your architectural needs. Angular Elements have proven to be a good choice in our case. Of course, it does not mean that there are no better solutions out there that will better suit your needs. My advice is to explore available solutions and technologies, but keep your eyes on Web Components, as they are getting a lot of traction these days.