


Continuing on the last post about setting up the basic configuration for React and Webpack, let's see how to use styles with Webpack. You can check out the previous post here:
Add styles
First, lets add index.scss file, in the src folder. We should have the following structure:
REACT-APP
└───src
│   └───App.js
│   └───index.js
|   └───index.html
|   └───index.scss
└───package-lock.json
└───package.json
└───webpack.config.json
Let's say we want to use it to color the text on the page in red. Add the following content to the stylesheet file:
h1 {
  color: red;
}
Next, we need to import it in the index.js file using: import "./index.scss";. This is an interesting syntax because we are not importing any values, we only need to initialize this module. In ES module world this kind of module is considered as a side effects only module. In Webpack world this works because Webpack treats all files and assets like modules. This means, for example, that stylesheet and image files are considered as a module. Later on, in Webpack configuration, we decide how will we load and use these modules.
But if we try to run Webpack build command, we will see the familiar error telling us that we are missing the appropriate loader to handle SCSS file type.
Style loaders setup
Since we will use Sass for styling, we need to install the required loader for this file type. If we look up the loaders for Sass, we will find the sass-loader. According to the documentation, it loads a Sass/SCSS file and compiles it to CSS. Looks like what we need, so let's install it.
npm install sass-loader sass --save-dev
sass is the internal dependency of the loader.
Now we can add the following rule to the module.rules array in the Webpack configuration file:
{
   test: /\.(s(a|c)ss)$/,
   use: ['sass-loader']
 },
If we try to run the Webpack build command again, we will get an error that looks like this:
ERROR in ./src/index.scss 1:3
Module parse failed: Unexpected token (1:3)
File was processed with these loaders:
 * ./node_modules/sass-loader/dist/cjs.js
You may need an additional loader to handle the result of these loaders.
Let's try to understand some key concepts that should help us understand this error:
moduleinside the Webpack configuration determines how the different types of modules within a project will be treated.module.rulesinside the Webpack configuration contains rules that can modify how the module is created. They can apply loaders to the module.module.rulesallows you to specify several loaders within your Webpack configuration. This is called loaders chaining. Each loader in the chain applies transformations to the processed resource. A chain is executed in reverse order. The first loader passes its result (a resource with applied transformations) to the next one, and so forth.- Result of the last loader in the chain should be a
Stringor aBuffer(which is converted to a string), representing the JavaScript source code of the module.
Using this information, we can conclude why we are getting the error: sass-loader is compiling Sass to CSS, but it does not return String or a Buffer, which represents
the JavaScript source code of the module. This module would represent index.scss file and it would be used during the runtime. To achieve this, we will install additional loaders:
npm install css-loader style-loader --save-dev
We should also change the loaders configuration:
{
   test: /\.(s(a|c)ss)$/,
   use: ['style-loader','css-loader','sass-loader']
 }
css-loader will process the CSS and resolve import and url(...) statements, meaning it will resolve all the dependencies of the CSS file. It then returns a module that represents index.scss file. Problem is that we don't have much of use from this module, since it will not include the styles in the output bundle. The loader that we are going to use for this purpose is style-loader . This loader will use the output from the css-loader and return a module that injects the CSS in the DOM during the runtime.
If you run the application now, styles will be applied. Since they are injected in the head tag at runtime, you won't see them in the source code of the index.html file. You will see them only if you inspect the page within the browser.
Production mode setup
For production builds it's recommended to extract the CSS from the bundle. That way, we can use parallel loading of CSS/JS resources later on. This can be achieved by using mini-css-extract-plugin to extract the CSS when running in production mode. First, install the plugin:
npm install mini-css-extract-plugin --save-dev
Now we can use the following configuration for the loaders:
{
   test: /\.(s(a|c)ss)$/,
   use: [MiniCssExtractPlugin.loader,'css-loader','sass-loader']
 }
Also, we should include the new plugin in the configuration:
plugins: [
    new HtmlWebpackPlugin({
        template: path.join(__dirname, "src", "index.html"),
    }),
    new MiniCssExtractPlugin(),
]
If we run the build command, we would get an extracted CSS file that contains the required styles. But we would also get the same output when running webpack serve command and this is not what we want. In the development environment, it is enough to use css-loader loader which injects the styles in the head tag. Since we want to use different loaders and plugins based on the environment, we will have to use different configurations. The recommended way to do this is to have separate configuration files for each environment. To keep things DRY, we should also have a common configuration file, that will contain configuration that is shared for all environments. Let's delete webpack.config.js file and add the following files instead:
webpack.common.js
const path = require('path');
const HtmlWebpackPlugin = require('html-webpack-plugin');

module.exports = {
    entry: path.join(__dirname, "src", "index.js"),
    output: {
        path:path.resolve(__dirname, "dist"),
    },
    module: {
        rules: [
            {
                test: /\.?js$/,
                exclude: /node_modules/,
                use: {
                    loader: "babel-loader",
                    options: {
                        presets: ["@babel/preset-react"]
                    }
                },
            },
        ]
    },
    plugins: [
        new HtmlWebpackPlugin({
            template: path.join(__dirname, "src", "index.html"),
        }),
    ],
};
webpack.dev.js
const { merge } = require('webpack-merge');
const common = require('./webpack.common.js');

module.exports = merge(common, {
    mode: 'development',
    devServer: {
        port: 9000,
        open: true,
    },
    module: {
        rules: [
            {
                test: /\.(s(a|c)ss)$/,
                use: ["style-loader", "css-loader", "sass-loader"],
            },
        ]
    },
});
webpack.prod.js
const { merge } = require('webpack-merge');
const common = require('./webpack.common.js');
const MiniCssExtractPlugin = require("mini-css-extract-plugin");

module.exports = merge(common, {
    mode: 'production',
    module: {
        rules: [
            {
                test: /\.(s(a|c)ss)$/,
                use: [MiniCssExtractPlugin.loader, "css-loader", "sass-loader"],
            },
        ]
    },
    plugins: [
        new MiniCssExtractPlugin(),
    ],
});
To merge development and production configurations with the common configuration we will use webpack-merge utility, so lets install it:
npm install webpack-merge --save-dev
After adding separate configuration files we can now pass the required configuration to the build command using --config parameter. To avoid typing Webpack build and serve commands every time, we can add the following to NPM scripts in package.json:
"scripts": {
    "start": "webpack serve --config webpack.dev.js",
    "build": "webpack --config webpack.prod.js"
  },
Now you can use npm start to run Webpack dev server and npm run build for the production build.
CSS modules
When using style-loader and MiniCssExtractPlugin loaders, we are using global styles in the application. As an alternative to this, we can use locally scoped styles that are limited to components. This approach is called CSS modules. If we want to use CSS modules, we can pass additional configuration to css-loader:
 {
    test: /\.(s(a|c)ss)$/,
    use: [
        "style-loader",
        {
        loader: 'css-loader',
        options: {
            importLoaders: 1,
            modules: true
        }
        },
        "sass-loader"
    ],
},
This way CSS modules mode will be enabled for all Sass files. To test this out add a new class definition to index.scss file:
.red {
  color: red;
}
Then we can import the styles in the component like this:
import React from "react";
import style from "./index.scss";

export default function App() {
    return <h1 className={style.red}>Hello World</h1>;
}
If you run the npm start now, you will notice that the class names are now transformed to unique values.
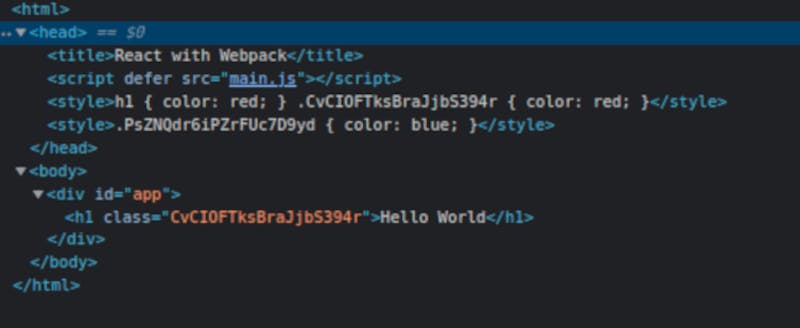
And this is what CSS modules are all about, we are using unique names for the styles. In such a way, we avoid possible conflicts with globally available style names.
Conclusion
This time, we covered the basics of loading styles in Webpack. In the development environment, we use loaders that inject the styles in the DOM, but in the production environment we want to extract the styles in a separate file, so we can benefit from parallel loading of CSS and JS files. We have seen how to set up configurations for different environments and how to use NPM scripts for Webpack commands. Also, we briefly touched on the subject of CSS modules.