How Spring and Java work together

If you are a Java developer, chances are pretty high that at some point you used Spring framework. You bootstrap the application with Spring Boot and watch the magic happen with minimum effort. But every once in a while, you will encounter a problem and wish you knew what was going on under the hood.
To better understand the Spring Boot application, we should start from the beginning. Most new developers are missing the basics of Java architecture and that's why Spring remains something of a puzzle for them. Covering the historical context of Spring and revisiting basic Java concepts will help with a better understanding of the Spring framework and why it came to be.
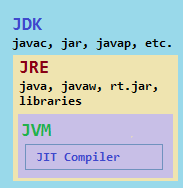
Java platform
The Java platform is a suite of programs that facilitate developing and running programs written in the Java programming language. A Java platform consists of the following components:
Java Virtual Machine, or JVM, loads, verifies, and executes Java bytecode.
Java Runtime Environment, or JRE, is a set of software tools responsible for the execution of the Java program or application on your system. It provides the libraries, the Java Virtual Machine, and other components to run Java applets and applications.
Java Development Kit, or JDK, is an implementation of the Java platform specification, including compiler and class libraries. There are various JDK implementations, most used are Oracle JDK and OpenJDK. They come in a form of software packages you download in order to create Java-based applications.
There may be servers and alternative libraries that depend on the requirements.
Different platforms target different classes of device and application domains. Let's focus on these:
- Java Standard Edition - The core Java programming platform. In addition to the core API, the Java SE platform consists of a virtual machine, development tools, deployment technologies, and other class libraries and toolkits commonly used in Java technology applications.
- Jakarta Enterprise Edition(formerly known as Java EE) - It is built on top of the Java SE platform. The Enterprise Edition platform provides an API and runtime environment for developing and running large-scale, multi-tiered, scalable, reliable, and secure network applications. Since 2017 development and progression of the specifications have been taken on by the Eclipse Foundation.
Java application setup
Let's gain some insights on how to set up a basic Java application. First off, download Java Standard Edition JDK. We will use the following project structure:
HelloWorldJava
└───src
│   └───com.example.helloworld
│       └───Application.java
Application.java file should have the following content:
package com.example.helloworld;

public class Application {
    public static void main(String[] args) {
        System.out.println("Hello world!");
    }
}
First, we are going to compile our source code to JVM bytecode using javac compiler:
javac src/com/example/helloworld/Application.java -d out
Using the -d option, we define the output directory. After successful compilation, the compiled bytecode is located in out directory. The corresponding class file is generated for HelloWorld class and it will be located in out/com/example/helloworld/ directory. Now, we can run the compiled code using java launcher:
java -classpath out/ com.example.helloworld.Application
The java command starts a Java application. It does this by starting a Java runtime environment, loading a specified class, and calling that class's main method. The important thing to notice is the -classpath option. The class path tells JDK tools and applications where to find third-party and user-defined classes -- that is, classes that are not Java extensions or part of the Java platform. The classpath needs to find any classes compiled with the javac compiler -- its default is the current directory.
When we put the out directory on the classpath, it corresponds to the root of the qualified namespace. So, when running a class named com.example.helloworld.Application, it will look for a class file in the following path: out/com/example/helloworld/Application.
If the java command is successful, we should see the message: Hello world!.
JAR files
JAR stands for Java Archive. It is a package file format used to pack multiple Java class files and resources(text, images, etc.) into one file. This file can then be distributed and used by other Java applications.
We can create a JAR file from our application using the JAR tool. From the out directory execute the following:
jar cf pack.jar com/example/helloworld/*
Now, there should be a pack.jar file in the out directory. To view the contents of a JAR file we have created, use the following command:
jar tf pack.jar
The output shows that the JAR file contains the Application class file and a default manifest file, META-INF/MANIFEST.MF, which was automatically placed in the archive by the JAR tool. What's the purpose of a manifest file? It helps JAR files to support electronic signing, version control, package sealing, and other helpful features.
After we pack the JAR file, we can run it with java launcher: java -jar pack.jar. But if we try, we will get the message saying we are missing the entry point attribute in the manifest file. This can be fixed by using the e flag when creating the JAR file. This way, we specify the application entry point without editing or creating the manifest file:
jar cfe pack.jar pack.jar com/example/helloworld/*
Now we can run the JAR file successfully.
Web applications
When developing web applications, Enterprise Edition platform is used. The EE platform includes the Java servlet specification, which supports HTTP request handling. Every JEE JDK implementation also requires a container, which is a server that runs JEE applications. Some of the implementations of these containers are Glassfish, Tomcat, and Jetty.
Things get confusing here since you can see many terms that sound similar and are hard to differentiate: application server, servlet container, runtime, web container, etc. These are key differences:
- Application server - full-fledged application server implements the whole EE stack and it comes with all the enterprise and integration tools. An example is Glassfish.
- Servlet container/Web container - implements the servlet specification. It also supports other specifications like JSP and JSF. Tomcat and Jetty fall into this category.
It is worth mentioning that embedded servlet containers also exist. This means that instead of running the application inside the external servlet container, the servlet container is packed together with the application.
JEE web applications are packed in WAR files. WAR stands for Web application Archive. The WAR file contains the web application that can be deployed on any servlet container. WAR files are JAR files with a specific format. This format is defined in the servlet specification. Essentially, the WAR file is a standard format for web applications that has specific directories and specific files.
Running servlets in Tomcat
The easiest way to test out Tomcat is by running it with the Docker container. The following command will install and run Tomcat on port 8080:
docker run --rm --name tomcat-server -p 8080:8080 tomcat:9.0
There are no web applications loaded by default, so you will get a 404 page when opening http://localhost:8080. Tomcat comes packed with example applications, but for security reasons, you have to manually enable them. This can be done with the following commands:
docker exec -it tomcat-server /bin/bash
mv webapps webapps2
mv webapps.dist/ webapps
exit
Now if you open http://localhost:8080 page, you should see something like this:
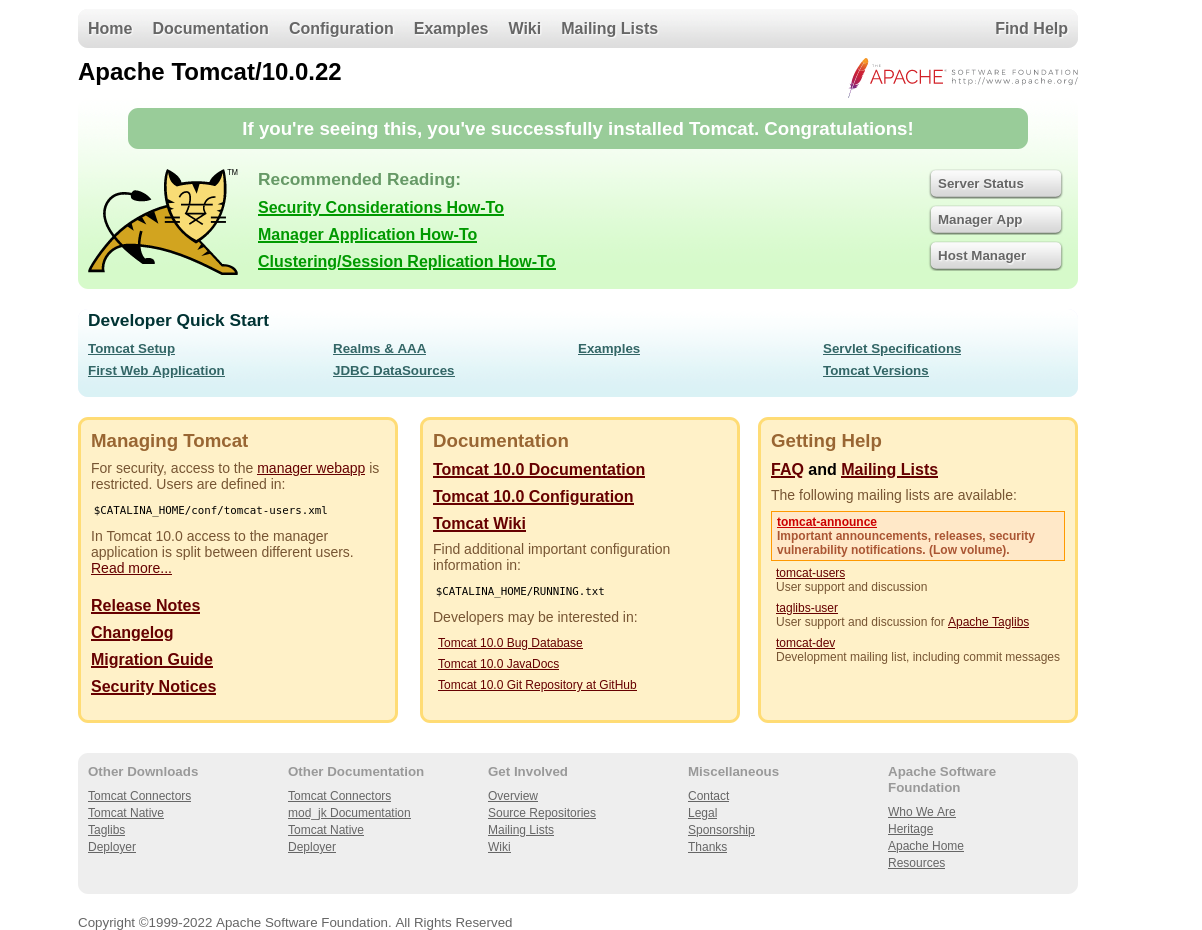
Follow the Servlet Examples link in the Developer Quick Start section of the page. There, click the Servlet Examples link. Now you can see a simple servlet in action by clicking the Hello World sample's Execute link. That will bring your browser to the http://localhost:8080/examples/servlets/servlet/HelloWorldExample URL, where you will see the Hello World! message.
If you go back and click the Source link, you will see the source code of the HelloWorld servlet. It's a simple class that extends HttpServlet class. This is important because servlets must implement the Servlet interface to run inside a servlet container. HelloWorld class defines a method called doGet(). This method handles GET requests and outputs HTML code containing Hello World! message.
The question is how does Tomcat know to map http://localhost:8080/examples/servlets/servlet/HelloWorldExample URL to the HelloWorld.doGet method? The answer is that this is defined in the meta-data file of the Java web application. This file is called web.xml and it tells how to map URLs to servlets. The exact location of this file inside the container is webapps\examples\WEB-INF\web.xml. It looks something like this:
<?xml version="1.0" encoding="UTF-8"?>
<web-app xmlns="https://jakarta.ee/xml/ns/jakartaee"
  xmlns:xsi="http://www.w3.org/2001/XMLSchema-instance"
  xsi:schemaLocation="https://jakarta.ee/xml/ns/jakartaee
                      https://jakarta.ee/xml/ns/jakartaee/web-app_5_0.xsd"
  version="5.0"
  metadata-complete="true">

<!-- ...CODE REMOVED FOR BREVITY... -->
    <servlet>
        <servlet-name>HelloWorldExample</servlet-name>
        <servlet-class>HelloWorldExample</servlet-class>
    </servlet>
    <servlet>
        <servlet-name>RequestInfoExample</servlet-name>
        <servlet-class>RequestInfoExample</servlet-class>
    </servlet>

    <servlet-mapping>
        <servlet-name>HelloWorldExample</servlet-name>
        <url-pattern>/servlets/servlet/HelloWorldExample</url-pattern>
    </servlet-mapping>
    <servlet-mapping>
        <servlet-name>RequestHeaderExample</servlet-name>
        <url-pattern>/servlets/servlet/RequestHeaderExample</url-pattern>
    </servlet-mapping>

<!-- ...CODE REMOVED FOR BREVITY... -->

</web-app>
From the example, we can see that it contains the mappings of servlets to the URL and their corresponding servlet class.
Spring vs JEE
Spring came into being in 2003 as a response to the complexity of the early JEE specifications. JEE was relying heavily on the usage of Enterprise JavaBeans, which were hard to implement because of the boilerplate code is required. In a contrast to this, in Spring you could use simple POJO classes without the complicated boilerplate code. When using POJO classes you don't need to implement interfaces from the Spring Framework and don't need dependencies on other parts of the framework.
While it is considered that JEE and Spring are competing technologies, Spring is, in fact, complementary to JEE. Spring is integrating the following specifications from JEE platform:
- Servlet API
- WebSocket API
- Concurrency Utilities
- JSON Binding API
- Bean Validation
- JPA
- JMS
- Dependency Injection and Common Annotations specifications can be used instead of the default Spring mechanism.
Spring framework continued to evolve and with time other projects that extend the framework appeared. Let's name the most important:
- Spring Boot - adds automated configurations and tools that further simplify the building and testing of applications.
- Spring Data - provides a consistent approach to data access.
- Spring Security - provides comprehensive and extensible authentication and authorization support.
Spring comes packed with DI(dependency injection) container and it also has its own Aspect-Oriented Programming (AOP) framework.
Setting up Spring application
Of course, you could bootstrap Spring framework application with Maven or some other build tool, but let's do this the hard way. To manually bootstrap Spring, first, download Spring JARs from the Spring repository. Download the latest version available.
For example, you would download spring-5.3.9-dist.zip in this case:

In the HelloWorldJava project directory create a new directory called lib. There you can extract all the JARs from the downloaded ZIP file. Let's add a few new files to showcase how Spring Inversion of Control container works.
src/com.example.helloworld/HelloWorld.java
package com.example.helloworld;

public class HelloWorld {
    private String message;

    public void setMessage(String message) {
        this.message = message;
    }

    public void getMessage() {
        System.out.println(message);
    }
}
src/com.example.helloworld/HelloWorldConfig.java
package com.example.helloworld;

import org.springframework.context.annotation.Bean;
import org.springframework.context.annotation.Configuration;

@Configuration
public class HelloWorldConfig {

    @Bean
    public HelloWorld helloWorld() {
        return new HelloWorld();
    }
}
HelloWorld.java is a simple POJO class that will be defined as a bean in HelloWorldConfig class.
A bean is an object that is instantiated, assembled, and otherwise managed by a Spring IoC container.
HelloWorldConfig is a configuration class. Classes with @Configuration annotation can be considered equivalent to Spring XML configuration file, but represented with Java-based bean configuration. @Configuration indicates that a class declares one or more @Bean methods that will be used by the Spring container to generate bean definitions at runtime.
@Bean is a method-level annotation and a direct analog of the XML <bean/> element. For comparison sake, the HelloWorldConfig is exactly equivalent to the following Spring XML:
<beans>
    <bean name="helloWorld" class="com.example.helloworld.HelloWorld"/>
</beans>
Both will result in a bean named helloWorld being available in the BeanFactory / ApplicationContext, bound to an object instance of type HelloWorld.
We will modify our Application class in a way that it uses the newly created bean:
package com.example.helloworld;

import org.springframework.context.ApplicationContext;
import org.springframework.context.annotation.AnnotationConfigApplicationContext;

public class Application {

    private static ApplicationContext ctx;

    public static void main(String[] args) {
        ctx = new AnnotationConfigApplicationContext(HelloWorldConfig.class);

        HelloWorld helloWorld = ctx.getBean(HelloWorld.class);
        helloWorld.setMessage("Hello World!!");
        helloWorld.getMessage();
    }
}
ApplicationContext interface represents the Spring IoC container. Spring provides different types of ApplicationContext containers suitable for different requirements. In our case, we will be using AnnotationConfigApplicationContext since we are using
Java-based configuration with annotations. With getBean() method we retrieve the bean instance from the Spring container. Spring knows which bean to fetch because we pass HelloWorld as a required type. Finally, the message is printed to the console by calling HelloWorld.getMessage() method.
Running the app
As with any Java application, we first compile the source code to JVM bytecode:
javac -classpath "lib/*" -sourcepath src src/com/example/helloworld/Application.java -d out
We will need the Spring JARs, so we pass them to classpath option. With sourcepath option we define in which location are source files needed for compilation are located. After running the command, bytecode will be located in the out directory. Now, let's run the application:
java -classpath "out:lib/*" src/com/example/helloworld/Application.java
And you should see the message printing out on the console. Interestingly, if you remove the @Configuration annotation from HelloWorldConfig class application runs as expected. There is a difference, but it is very subtle. Best way to observe this is by adding another @Bean method that will consume HelloWorld bean:
  @Bean
    public HelloWorldConsumer helloWorldConsumer() {
        return new HelloWorldConsumer(helloWorld());
    }
HelloWorldConsumer implementation will be very simple:
  public HelloWorldConsumer(HelloWorld helloWorld) {
        System.out.println("HelloWorldConsumer created");
    }
Also, we should add a constructor to HelloWorld that will print out a message when a new instance of HelloWorld is created:
  public HelloWorld() {
        System.out.println("HelloWorld instance created");
    }
If you remove the @Configuration annotation and run the application, you should see the following:
HelloWorld instance created
HelloWorld instance created
HelloWorldConsumer created
Hello World!!
This tells us that HelloWorld instance was created twice and it is not acting as a singleton bean. But if you bring back the @Configuration annotation, HelloWorld instance will be created once. This is because with @Configuration annotation, any calls to bean methods are intercepted and a singleton bean instance is returned from the context.
Creating a Spring web application
As already mentioned, WAR files have to follow the specific format defined by the servlet specification. According to the specification, every WAR file has to have the WEB-INF directory. It is a special directory that contains all deployment information and application code. This directory has the following structure:
- WEB-INF/classes - contains Java class files
- WEB-INF/lib - contains JAR libraries
After we create the required directories, the project structure should look like this:
HelloWorldJava
└───src
└───WEB-INF
│   └───classes
│   └───lib
All the JAR files that we downloaded from the Spring repository should be moved to WEB-INF/lib directory. Next, let's add s Spring controller that will handle the requests:
src/com.example.helloworld/HelloWorldContoller.java
package com.example.helloworld;

import org.springframework.web.bind.annotation.GetMapping;
import org.springframework.web.bind.annotation.RequestMapping;
import org.springframework.web.bind.annotation.RestController;

@RestController
@RequestMapping("/greeting")
public class HelloWorldController {

    @GetMapping
    public String hello() {
        return "Hello World!!";
    }
}
@RestController annotation is used at the class level, which allows us to auto-detect implementation classes through the classpath scanning. Also, with this annotation, every request handling method of the controller class automatically serializes return objects into HttpResponse.
@RequestMapping is also used at the class level. It maps all the requests with the path /greeting to be handled by this controller.
Finally, we use @GetMapping annotation to mark the method that will handle all GET requests on /greeting path. This method will just return Hello World!! string.
Since Spring web application is actually a servlet, we will need to add the web.xml file. We will configure web.xml in such way that all HTTP requests are handled by DispatcherServlet class from Spring framework. DispatcherServlet is a front controller that is passing the requests to the relevant component using URL mappings.
WEB-INF/web.xml
<?xml version="1.0" encoding="UTF-8"?>
<web-app xmlns="http://xmlns.jcp.org/xml/ns/javaee"
         xmlns:xsi="http://www.w3.org/2001/XMLSchema-instance"
         xsi:schemaLocation="http://xmlns.jcp.org/xml/ns/javaee
                      http://xmlns.jcp.org/xml/ns/javaee/web-app_4_0.xsd"
         version="4.0"
         metadata-complete="true">

    <description>
        Hello World
    </description>
    <display-name>HelloWorld</display-name>

    <absolute-ordering />

    <servlet>
        <servlet-name>rest</servlet-name>
        <servlet-class>org.springframework.web.servlet.DispatcherServlet</servlet-class>
        <load-on-startup>1</load-on-startup>
    </servlet>
    <servlet-mapping>
        <servlet-name>rest</servlet-name>
        <url-pattern>/*</url-pattern>
    </servlet-mapping>

</web-app>
DispatcherServlet uses the following convention when looking for application-specific configuration file: [servlet-name]-servlet.xml. This means that we have to create a configuration file named rest-servlet.xml.
WEB-INF/rest-servlet.xml
<?xml version="1.0" encoding="UTF-8"?>
<beans xmlns="http://www.springframework.org/schema/beans"
       xmlns:xsi="http://www.w3.org/2001/XMLSchema-instance"
       xmlns:context="http://www.springframework.org/schema/context"
       xmlns:mvc="http://www.springframework.org/schema/mvc"
       xsi:schemaLocation="
        http://www.springframework.org/schema/beans
        http://www.springframework.org/schema/beans/spring-beans.xsd
        http://www.springframework.org/schema/context
        http://www.springframework.org/schema/context/spring-context.xsd
        http://www.springframework.org/schema/mvc
        http://www.springframework.org/schema/mvc/spring-mvc.xsd">

    <context:component-scan base-package="com.example.helloworld"/>
    <mvc:annotation-driven/>

</beans>
With context:component-scan tag we tell Spring to scan all elements in the provided base package and its child packages for Controller beans. mvc:annotation-driven tag defaults the basic components required for delegating the requests to Controllers.
Now, let's compile the application:
javac -classpath "WEB-INF/lib/*" -sourcepath src src/com/example/helloworld/* -d WEB-INF/classes
Class files are available in WEB-INF/classes directory. Finally, package everything in the WAR file:
jar -cvf out/helloworld.war WEB-INF/*
Deploying the application in Tomcat
First thing, start the Tomcat container:
docker run --rm --name tomcat-server -p 8080:8080 tomcat:9.0
Like in the previous Tomcat example, enable example applications:
docker exec -it tomcat-server /bin/bash
mv webapps webapps2
mv webapps.dist/ webapps
exit
To deploy the application, you will need access to Tomcat Manager. You can follow the guide on how to enable access to Tomcat Manager on this page. After enabling the Tomcat Manager, you can access it at the address http://localhost:8080/manager/html.

Go to the Deploy section of the Manager app and select the WAR file that we have created using the Browse button next to Select WAR file to upload. After uploading the file, click Deploy. And that's it, you will now be able to open the REST endpoint that we created on the address http://localhost:8080/helloworld/greeting.
Conclusion
We first covered Java platform basics and the origin of Spring framework. Also, we briefly touched on the important concepts like servlets, servlet containers, WAR files, etc. Then, we implemented the simple Spring application to understand basic Spring framework concepts. Also, we implemented the web application and deployed it to Tomcat server. This should help with a better understanding of what happens under the hood of any Spring application.
Project with code examples is available here.


